You can utilize this post to configure port forwarding routers NETGEAR interface.
Before we start up representing the way to configure port forwarding routers NETGEAR interface, let’s define “Port Forwarding” and what is the difference between it and “Port Triggering”?
By default NETGEAR router has a firewall blocks any connection by other devices in the public network “internet” to devices in your local network. So, if you want to allow specific connections to your local network, you must reconfigure the router.
Port Forwarding:
Port forwarding allows new connections “from the public network which may be blocked by the router to a certain port or port range” to go to a designated LAN machine. The ports are determined by the kind of server you want to run, (for example port 80 for a web server) and the IP is the private LAN IP of your web server. We will configure port forwarding routers NETGEAR interface.
Port Triggering:
Port triggering allows new connection from the outside to a certain port to go whatever LAN machine to make a specific outgoing connection which is defined by destination port.
For example:
You have two numbers (25, 113) one of them will be defined as trigger “25” and the other will be defined for the port number “113”. If any of your LAN machines creates an outgoing connection (=trigger) to port 25 “for example sending an email”, all of the incoming connection to port 113 will be temporarily routed to that machine. And then after a timeout, new connections to 113 will again be dropped.
Now returning to our main subject, how to configure port forwarding routers NETGEAR interface?
- First thing to do, go to a web browser and type this URL routerlogin.net in the address bar.
- A screen will prompt to you to insert your username and password of the router, most of routers take “admin” as a username, and “password” as a password by default unless you have changed the logins before, so insert your own username and password.
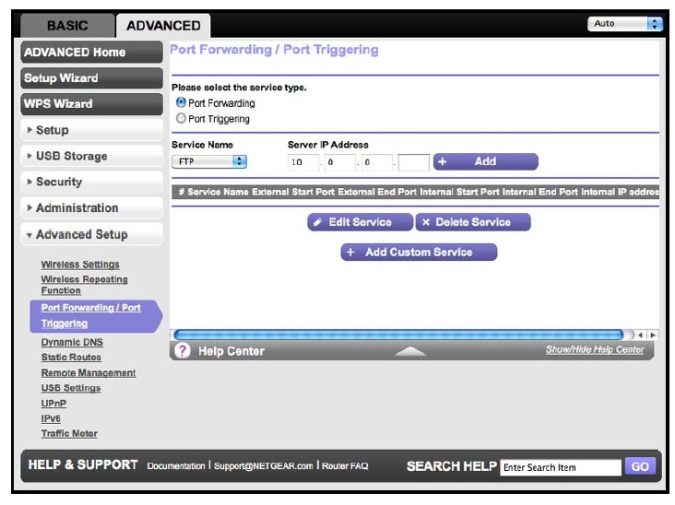
- Tap on Advanced tab, choose Advanced Setup, and then select Port Forwarding/Port Triggering.

- As you see in the above screenshot, there are two options you can select one of them as the service type “Port Forwarding” and “Port Triggering”, choose the Port Forwarding radio button.
- From the Service Name drop-down menu select the service or game you want to host on your local network. In the case you do not find the service in this list, try to find “To add a custom service” instructions.
- In the corresponding field to “Service Name”, “Server IP Address”; type the last digit of the IP address of your local computer that will provide the service and click the Add button. You can see the service in the list.
How to configure port forwarding routers NETGEAR interface to a custom service?
In order to add a service which does not appear in the drop-down menu of “Service Name” such as an application or a game, or any service you want to add, firstly you must define the port number of this service or at least the port range is used by your service or application.

To know more about like these details, please contact the publisher of the service or user groups or newsgroups.
- Like the last method to configure port forwarding routers NETGEAR interface, go to “Advanced” tab, select “Advanced Setup”, and then choose “Port Forwarding/ Port Triggering”.
- In the service type field, select the first choice “Port Forwarding” radio button.
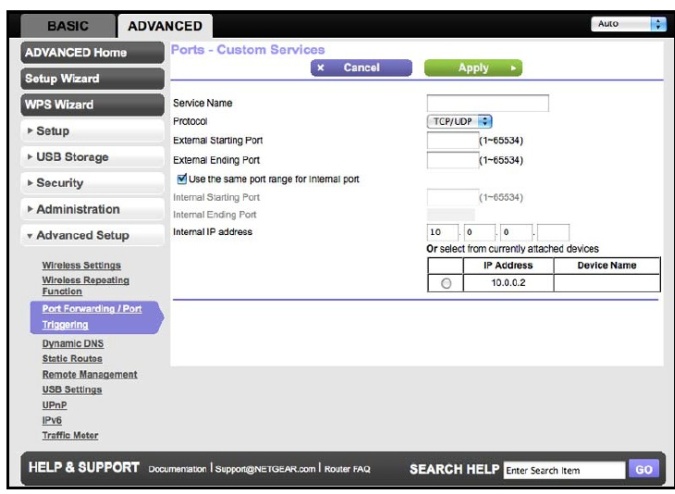
- Here it will be slightly different, so click on “Add Custom Service” button, you will see the following screenshot.
- In the Service Name field, you will choose the name as you prefer, but you should insert a descriptive name to relate the name to the service you want to add so that you can distinguish it.
- In the protocol field, select from the drop down menu the protocol of your service, if you are not sure, select the third choice “TCP/ UDP”.
- After that, type the beginning port number in the External Starting Port field.
In the External Ending Port field, put the same port number if your application uses a single port.
If your service or application uses a specific range of ports, enter the ending port number of the range in the External Ending Port field.
- Enter the IP address of your local computer that will provide the service or the application in the Server IP Address field.
- Finally click Apply to save changes you made.
You will find the service appeared in the list beneath “Port Forwarding/ Port Triggering” screen.
You can configure port forwarding routers NETGEAR interface for the following some products of NETGEAR router:
- D6200
- D6300
- DGN1000
- DGN2200
- DGN2200v3
- DGND3700
- DGND3700v2
- DGND4000
- DGND3800B
- AC1450
- JNR3210
- JR6150
In the case you want to add Internal Port; specify the internal ports by one of these methods:
- Leave the Use the same port range for Internal Port check box checked. As we mentioned before you can find more details about your service by contacting the publisher of the application or user groups or news groups.
- Type the port numbers in the “Internal Starting Port” and “Internal Ending Port” fields.
- In the Internal IP address field; type the IP address or select the radio button for an attached device listed in the table.
- Click Apply to save your changes.
Pay attention; these settings can be done for the following products only:
- R6700
- R7000
- R7500
- R7900
- R8000


